Etsy shop

Monday, September 12, 2016

Mixed media art process photos, The girl with rainbow freckles.

So the other day I was sitting around in the middle of a huge spurt of creative energy, and I thought I wonder if you can make splatter, painterly style rainbow freckles. Now in your head I imagined taking a larger brush with a rainbow of paint and splattering it all at once. This wouldn't work, I didn't try.so for fear of failure buto also because my favorite place to experiment is in my journal, I got my journal out and made up a face and tried it out. I have no idea how the girl in my journal ended up so.... red. I intended to create a rather dull greyish face and add the rainbow of freckles as contrast. But honestly, I'm awful at keeping things neutral. The spray of colors turned out.... ok? But not what I wanted, so I added some neon pen freckles to brighten her up.
This is my journal page practice! 


Today I made it my mission to recreate her, in small form, for my wall or to sell on etsy possibly with the other 6 by 6 paintings I'm doing. I have never recreated anything before, I'm not a planner, I tend to work intuitively, and it's hard! So I opened up my journal and set the first one next to me. I opened up my photo inspiration board on pinterest and found a face I liked and I got to work. I started out again trying to make a grey face, which didn't work in the end. In this face I only used three paints. A premixed red that had a couple different tones, paynes grey and black. I used a rainbow of color for the splatters and a red, grey and black colored pencil for details, white pen and green for her eyes. That's it!
First is the outline. All my paintings look like this right away, I don't add eye details until later 
Then I add some color. Before I added that red it was all paynes grey, I just couldn't still with it! I should have taken one more picture between this one and the next.

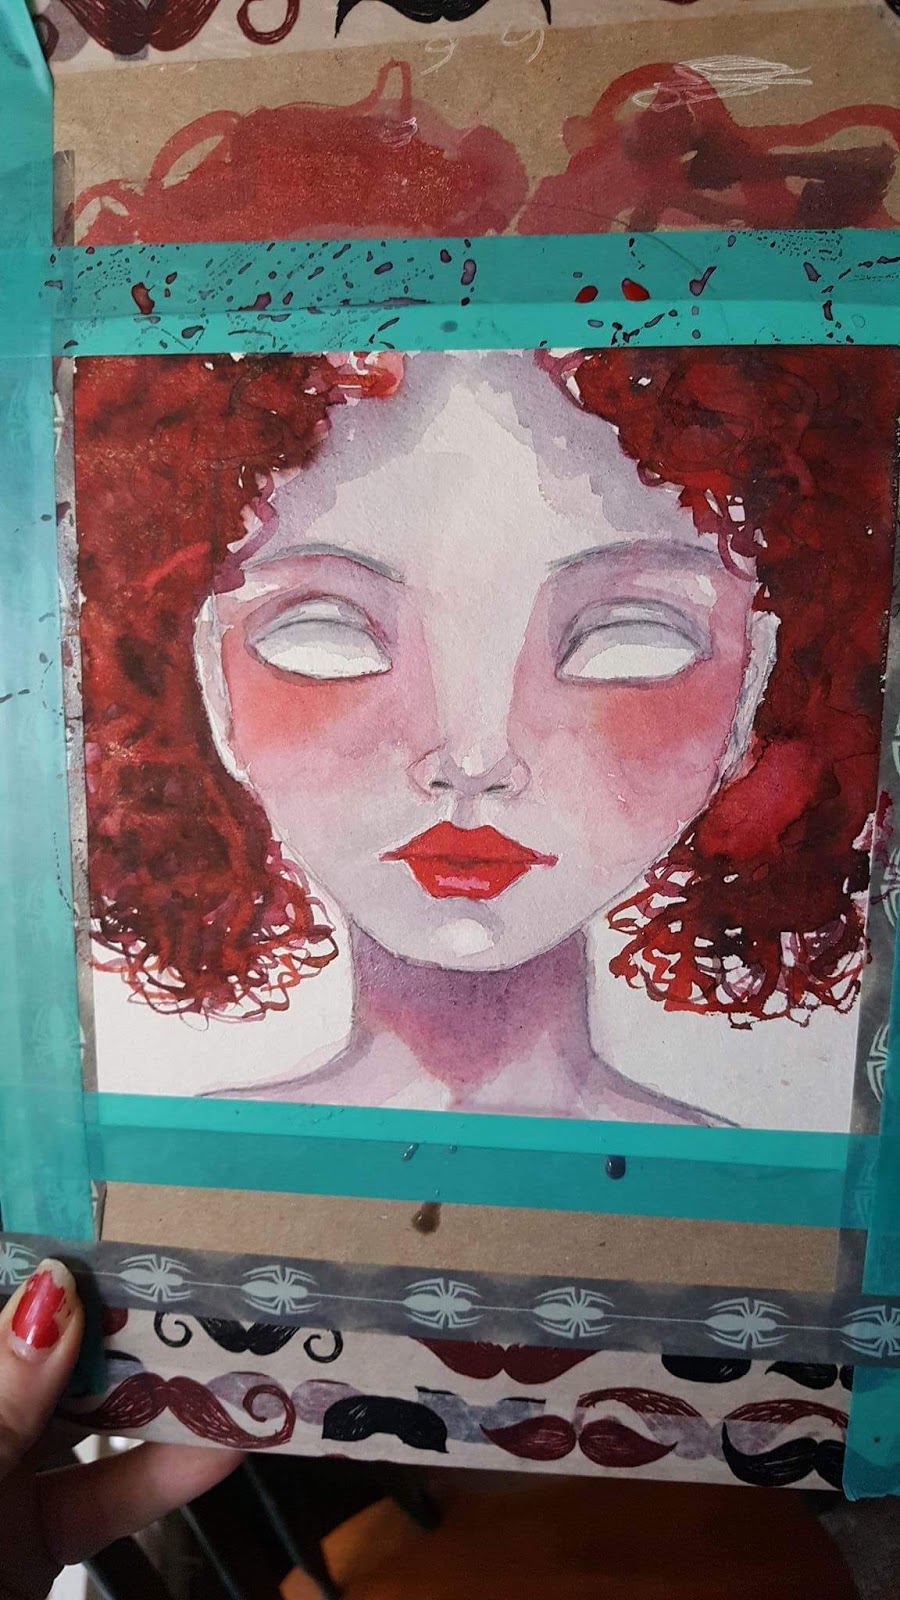
Next I added her hair. Usually hair is after skin for me but I didn't want to overdue the red on her face. I add shadows and lips and struggle with white space.

Eye details, I added the freckles, adding all the black lines at this point. 

And adding white!it's simple but it takes so many layers of watercolor! Here I add all the colored pencil, shade extra with red and grey pencils, I look back at the picture to see if anything looks wonky, try to straighten things up. 

Aren't the freckles cute? 

Friday, September 9, 2016

It's been awhile! Art Journal Fun!

I have been neglecting my poor ole blog! Lots of things have happened. I moved, I opened an etsy shop! I stopped running the art group :/ I developed a sort of style, inspired by tons of artists and creative technique. I found my favorite supplies to use (watercolors, yummy) I still work every day on progressing my style and also my ability, practicing features and composition and pattern and detail. I still have so far to go! I've been enjoying destroying a small sketchbook with watercolor and pen and other fun stuff. It hates the watercolor, it doesn't absorb right, it kills the paper, but for some reason I really love it. Here are a few examples, I'm enjoying testing out new supplies and techniques in my journal, I should really invest in a nice watercolor art journal but ehh, I will just beat this one up for a while longer.


Anyway,  am thinking of doing some art challenges but I want to know where to find them! Let me know if you have any warm up art exercises, fun techniques to try, art challenges to partake in!

Monday, April 27, 2015

Art "Recipe" Challenge!

So, I was sitting around not making art. It sucks, not making art. It really sucks. I was trying to think of a way to involve myself in the group I started, loved, and used to enjoy so much, but have lost touch with, without taking on commitments I couldn't keep. I have made like 4 pieces of art in.. months. Maybe something every month. So I was cruising around pinterest and I saw someone who does "art recipes" ...I think she does tutorials, I didn't really look at the process so much, I just saw the photos of supplies and the end result, and I thought this would be a cool way to challenge myself and the group, and participate in a way that was both self satisfying and interactive. I got some volunteers and we came up with recipe for all of us to follow, in different ways.

The Challenge.
Create a piece of art using (only) Paint (one kind of your choice), Collage Materials, Pen, Washi Tape, and Gesso. And (optional) use a warm toned palate (red, orange, yellow, pink)

My Take.

Materials..
I used an Elle Magazine for my collage materials, I got some adds out of it, cut some flowers, used a girls face for an image transfer, I also used a bird stamp I got from a girl from the group, she sent them to me on deli paper. I used three kinds of washi. One skull, one flower and some pointing fingers. For my paint I picked three colors from QOR high chroma watercolor set I have, Gold Green, Quinacridone Magenta and Transparent Pyrrole Orange. I couldn't find my Gesso so I just used some white acrylic paint. I used some gelly roll pens and my favorite black and white pens, and one paint marker that was kind of a cheat. 


My project.


I am upset that I didn't save any of the process photos. This started as an orange and pink watercolor background. I went over the area where I wanted her face to be with the white acrylic (gesso replacement) before putting it down. I transferred her face. It came off really well, so I just made my lines, I changed her eye shape a little and she wasn't really in this position, she had a lot of hair (it was a hair add) I didn't add much paint to her face, I added a little pink to her cheeks and her lips, the green to her eyes. I was going to give her sugar skull makeup, her eyes were so perfect for it.. but it just took it's own life. I darkened the background with the magenta and orange watercolors, I can't believe how deeply colored it is, its such an awesome color. Then I had to deal with her hair. I made up an imaginary shape and couldn't decide what to do with it. I added the bird for contrast and then afterwords I gave her a flower crown. That's it! I can't wait to see what you can do with these materials! Have fun. 

Oh, by the way, if you share on social media, we are going to use the hashtags #freereignart and #aehml if you want to use them, you are welcome to! It might be fun to see everyone's art that way. You can post your art challenge projects in the group, feel free to write a blog post so we can share your post on our pinterest board. And share with us on instagram or whatever you use :P 

Friday, September 26, 2014

A strange view of "Old Hollywood"

I made this art for a swap for my facebook group. I did not entirely intend to sign up for this swap, I spent a long time avoiding getting started. I kept thinking I would do an image transfer and intensify the contrast with paint or whatever and keep it at that. But it was boring to me so I avoided it, and avoided it, and avoided it and.. you get the point.
So, the Documented Life Project is a group on facebook. They do weekly prompts. I will be completely honest and say I am not keeping up with them, but occasionally the prompts will inspire something else, something completely different, and I use them to "begin" projects.
So, here I was. Tonight, sitting. I had been browsing through the DLP feed, looking at a lot of splattery-drippy art. I had printed out some old hollywood actresses, I decided to just go for it. I started to spatter and flick and drip watercolor, I smeared some inktense across the wet drips and extra water, I used some gelatos, the background was fun. Once the background was done, dryish, I decided to try my first inkjet printed image transfer. Here was the result. 
At this point, it looks good. Its not dramatic enough for me, so, I attempt to play up the contrast, and add extra drippy splatterness. 

almost there! Added pen, added black watercolor to her body area, it went crazy! The paper was left after the image transfer it soaked 

I don't know why I felt like it had to have purple... but I so did. I could not stop myself. Anyway, I hope my partner will enjoy my strange interpretation of the "Old Hollywood" theme. I had fun making it. 

Saturday, September 20, 2014

Art Every Day.

I started to try to challenge myself to do art FOR MYSELF every day. I do a lot of art that I give away (in exchange for art from others) but not very much for myself. I find my days lacking in free time, lately, especially now that we have a vehicle. When you don't have a car, you don't go anywhere unless it is necessary. I thought that having a car would give me more free time, but not really, it just gives me more out of the house, spending time with Rob and Greyson time. which is enjoyable, and wonderful, of course. Regardless, the amount of "art for me" that I've done is pathetic. I challenged myself midsummer and I bought a sketchbook especially for it ..at the end of August, maybe? I have filled 4 pages. I am ashamed. But maybe putting it out there will encourage me. Here are all of my... sort of pathetic, art of the days. I have found it really therapeutic to write on the pages, sometimes covering the journalling up with art. I have been also doing this in my abandoned DLP art journal, pretty much using it exclusively as a journal now, making use of all the pre-painted tip-ins and the boring layouts. I promise, next time I post this I will have better things to show you!
Playing with twinkling h2os and pen, mostly just covering up the journalling I did, trying to get myself moving.

I drew this for practice, I will be doing more soon, for a swap.

Playing with my new gelatos. This was extremely therapeutic for me, the gelatos are really fun to use, smooth, creamy, easily manipulated with water. Really like them.

Just forcing myself to do something. 

Friday, September 19, 2014

Alcohol Ink Process Photos.

It might not be as interesting as I made it seem :P
this was pretty much my step one. I had started out trying to make it a light wash of color, I used purple and my partner really hates purple, so I was trying to change it to blue, I used a bit too much alcohol in one spot, it turned out looking like a moon. The bottom half was how I intended it to be, it was supposed to go purple, pinks/red, down to yellow, and then I was going to do a little green at the bottom and spots of red, obviously I got distracted. The red really took over most of it, the pink pretty much completely disappeared. At this point, I stopped and looked at what I had and decided where to go. 

I added more blue to the top to drown out the purple. I took alcohol and "washed" the sides, leaving all the interesting parts in the middle. It started to look sort of like a sky and maybe a mountain.. 

I remade the circle in the middle, and decided to make the red at the bottom smoother. I added pen at this step, emphasising the circle at the top for interest. 

added more pen, you can't really tell in the photo

some details

Abstract Art.

It is not easy for me to do abstract art, I will start something abstract and I will see something within it, and I can't help myself but follow through. I did this artwork with alcohol inks and pen. I can't keep myself from using pen, I think that is ok. It is for a swap, I found myself so in love with it that I am having trouble convincing myself to send it away, it looks to me sort of spacey, very lunar at least. I love the moon, it seemed to get so much depth, I had to redo the moonish object several times, it is amazing what you can do and change with alcohol inks. I am going to post the finished project here, and a process set of photos in another post, so you can see how much you can transform alcohol inks, and the really amazing process. I think that my favorite thing about alcohol inks is that you CAN NOT think too much, they sort of make art themselves, you just help them along. Anyway, this is the final "abstract art" piece for my swap, I think I may get it scanned and printed tomorrow for myself.